|
<< Click to Display Table of Contents >> Index Panel |
  
|
|
<< Click to Display Table of Contents >> Index Panel |
  
|
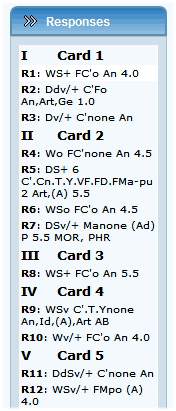
he Responses index panel presents a list of codes by response and divides responses according to their R number and their card number. It updates every time you save a coded response.

To edit saved response, click on the response in the Responses panel. It will loads the response codes into the main page, and you can easily change and correct codes for this response. Click save when you done editing.
In case you want to add a new response between responses you already saved. (For example, when you mistakenly skipped a response.) First, click on the saved response (the one you want the new response to come after), and then click on the appropriate Save button in the Options section. Click on Save and Add New Response to: "This Card" if you want to add a new response to the current card; or "Next Card" if you want to add a new response to the card immediately following the current card. The RAP3 will create a new response right in the place you wanted it, and will automatically update the R numbers of the other responses. Once you enter all the appropriate codes for the new response save it.
To delete response, click on the response in the Responses index panel and click on the Delete Response button in the Options section. The RAP3 will ask your confirmation to delete the response.
To Reject a Card, click on the appropriate Card in the Responses index panel, then click on the Card Rejection button in the Options section. The RAP3 will notify you that rejecting the card will delete any coded responses that were added to this card. If later you change your mind and decided that the card was not rejected, click on the card "Rejected" notification in the Responses index panel and choose to cancel card rejection. You will have to re-enter the sequence of codes for this card.
Next: Reports table.